Shopify’s Online Store 2.0 is a collection of features and improvements of existing features that help to make themes and theme apps easier to build. It makes the themes more flexible and easier to maintain. It mostly relies on JSON templates rather than Liquid templates. Previously, only the homepage used the JSON templates; all other pages relied on liquid templates.
You can migrate your theme to Online Store 2.0 by converting the liquid templates into JSON templates and moving the liquid code and HTML to sections. Then, include the sections in the JSON template. It is not mandatory to upgrade your theme to Online Store 2.0. You can continue using the vintage theme (1.0) if it meets your requirements.
Migrating to Online Store 2.0
You can migrate your themes to Online Store 2.0 and get its features in several ways.
- Download an Online Store 2.0 theme from the Shopify Theme Store: If your current theme does not provide Online Store 2.0 features, download an Online Store 2.0 theme from the Shopify Theme Store. Then, update the look and design of the theme and you will get access to the new features.
- Download a new version of the theme: If your theme provides an updated version that uses Online Store 2.0, then add the latest version of the theme to the store and get access to the new features.
- Migrate the theme manually: If your theme does not provide a new version with Online Store 2.0 features and you do not want to use another theme, then you can migrate your theme manually. Convert the liquid template into JSON templates and move the liquid code and HTML into sections. Then, include the sections in your new JSON template.
Manually migrating templates to Online Store 2.0
In this article, you will learn to move the codes from liquid template to a section file and add the section in the JSON template. Here, you will move the codes from a product.liquid template file into a product-template.liquid section file. Then, include the section in a new product.json template.
Requirements:
Make sure to do these things before you start migrating your theme.
- Identify the theme that you want to migrate.
- If you are using Shopify CLI and a local development environment to migrate the templates:
- Install the Shopify CLI on your system.
- Make sure you have a staff account or a collaborator account for the store you want to work on, or that you are the owner of the store. If you have a staff account or collaborator account, then you must have the Manage themes permission or Themes permission for the store. Store owners have these permissions by default.
- Take a note of the URL of the store.
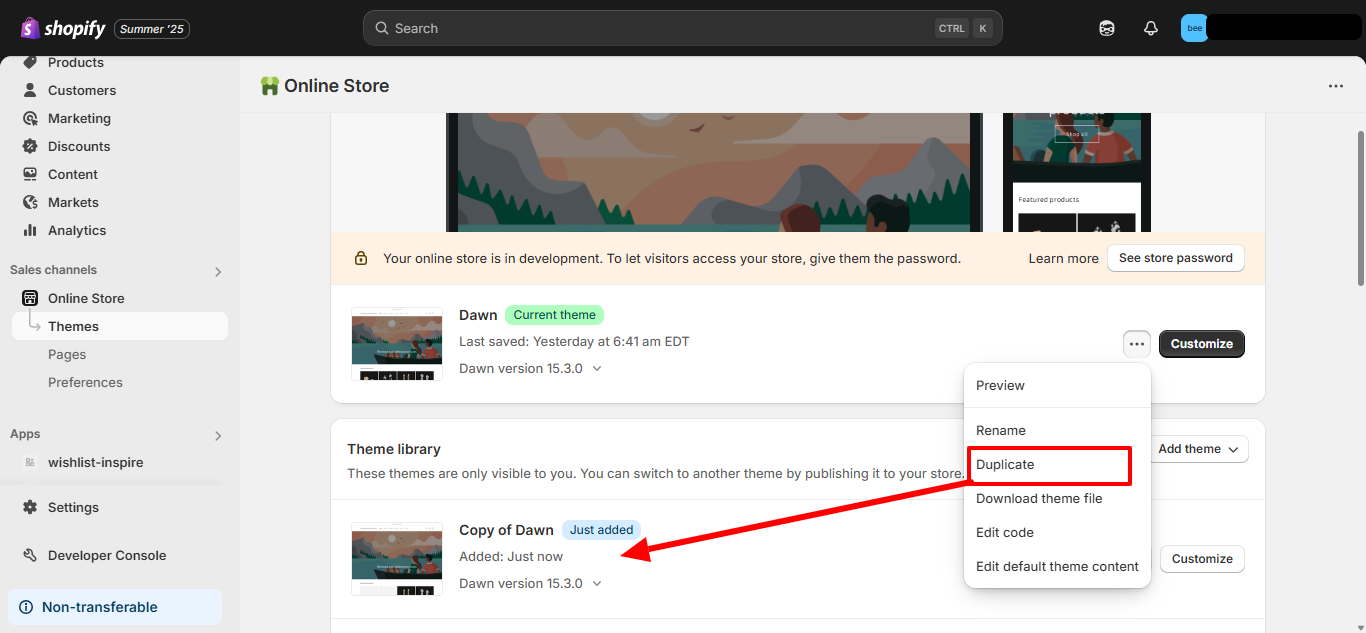
Step 1: Back up the theme
Once you have identified your theme to migrate, make a copy of your theme.
- If you want to edit the theme in the code editor, then duplicate the theme and make sure the theme is not published while you are editing. Also, add another duplicate of the theme for backup.
- If you are using the local development environment and Shopify CLI to edit. Then, download the theme files using the shopify theme pull command.
Step 2: Identify sections and remove section references
To start converting your liquid template to JSON template, make a note of all the {% section %} tags and then remove it. You have to remove these references so that you can move the remaining code into a section file. A section file can not have references to another section.
- Open the theme in your local development environment or code editor.
- Now, find and open the product.liquid file in the /templates directory.
- Search for any {% section %} tag, note their names and where these tags are located. There are two section included in product.liquid template.
{% section ‘product-template’ %}
{% section ‘product-recommendations’ %} - Most of the markups like product title, products images, add-to-cart buttons, etc are included in product-template section. Meanwhile product-recommendations section contains a list of products that are automatically selected as suggestion for customers.
- Once, you have made a note of all the {% section %} tags, delete these tags from product.liquid template.
Step 3: Move code from the template into a section
After you delete the {% section %} tags from the template code, you need to move these code to an existing section or a new section.
1. Add code to an existing section
- Open the section file where you want to put the code into.
- Then, copy the remaining code of product.liquid template and paste it in the section file above {% schema %} tag.
2. Add code to a new section
- In the /section directory, create a file. For example product-template.liquid. If created this section in the code editor, then delete the default code from the section file.
- Then, copy the remaining code of product.liquid template and paste it in the empty section file.
Step: 4 Delete the Liquid template file
Once, you have moved the code from product.liquid file, delete it from the /template directory. You have have to delete the liquid template file because it will be replaced by product.json file. Also, the product.liquid and product.json files can not be placed in the /templates directory at the same time.
Step 5: Create a JSON template file
After deleting the product.liquid file, you can create JSON template file for replacement.
- Create a new file named product.json in the /template directory.
- If you are using the code editor,
➣ Click on Add a new template.
➢ Then, choose Product, from the Create a template for drop-down.
➣ Then, Select JSON as the template type. - If you are using the local development environment, then create a new file named product.json in the /templates directory.
- If you are using the code editor,
- After creating the product.json file, replace the default code of this file with the following codes and Save it.
{
  "sections": {
    "main": {
      "type": "product-template"
    }
  },
  "order": [
    "main"
  ]
}
Step 6: Test the template
After creating the new template, open it in the theme editor to check if it renders properly. In the theme editor, navigate to the product page. You can see an Add section button in the left sidebar. By clicking it, you can access all the section in product page which was accessible in homepage previously.
Step 7: Add references to sections
If product.liquid template contained references to another sections like product-recommendations, then you can define it in the product.json and, then define the order of the sections.
- Open the product.json template file that contains only reference of main section(the section that contains your migrated code).
- Now, add the product-recommendations section in the product.json file using the given structure. In this structure, the type property contains the filename of the section.
{
  "sections": {
    "main": {
      "type": "product-template"
    },
    "recommendations": {
      "type": "product-recommendations"
    }
  },
  "order": [
    "main"
  ]
}- Then, add the recommendations in the order array which will define where will this section appear. Now, you code looks like this.
{
  "sections": {
    "main": {
      "type": "product-template"
    },
    "recommendations": {
      "type": "product-recommendations"
    }
  },
  "order": [
    "main",
    "recommendations"
  ]
}
Step 8: Add support for app blocks to sections
To use app blocks in the sections, you need to add necessary schema and render the block content in the section.
Enable app blocks in the section schema
To enable adding the app blocks in the section, you need to add blocks of type @app to the section’s schema. To add support for app blocks in the product-template section, you can add the code below.
"settings": [
  ...
]
"blocks": [
  {
    "type": "@app"
  }
]
Render app blocks
You need to check the appropriate type of the block to render an app block. Then, render the block using {% render block %} as given below.
{% for block in section.blocks %}
  {% case block.type %}
    {% when '@app' %}
      {% render block %}
    ...
  {% endcase %}
{% endfor %}
Step 9: Repeat the process
Now, You can repeat the same process to convert all of the sections in the theme.
Please contact us at manish@bay20.com or call us at +91-8800519180 / +91-9582784309 for any support related to Shopify. You can also visit the Shopify development page to check the services we offer.